本文将通过实际的例子来演示如何在asp.net core中应用jwt进行用户认证以及token的刷新方案(asp.net core 系列目录)
一、什么是jwt?
jwt(json web token)基于开放标准(rfc 7519),是一种无状态的分布式的身份验证方式,主要用于在网络应用环境间安全地传递声明。它是基于json的,所以它也像json一样可以在.net、java、javascript,、php等多种语言使用。
为什么要使用jwt?
传统的web应用一般采用cookies+session来进行认证。但对于目前越来越多的app、小程序等应用来说,它们对应的服务端一般都是restful 类型的无状态的api,再采用这样的的认证方式就不是很方便了。而jwt这种无状态的分布式的身份验证方式恰好符合这样的需求。
二、jwt的组成:
jwt是什么样子的呢?它就是下面这样的一段字符串:
eyjhbgcioijiuzi1niisinr5cci6ikpxvcj9.eyjodhrwoi8vc2nozw1hcy54bwxzb2fwlm9yzy93cy8ymda1lza1l2lkzw50axr5l2nsywltcy9uyw1lawrlbnrpzmllcii6ijawmiisimh0dha6ly9zy2hlbwfzlnhtbhnvyxaub3jnl3dzlziwmduvmduvawrlbnrpdhkvy2xhaw1zl25hbwuioilmny7lm5silcjuymyioje1nju5mjmxmjisimv4cci6mtu2ntkymzi0miwiaxnzijoiahr0cdovl2xvy2fsag9zddo1ndixncisimf1zci6imh0dha6ly9sb2nhbghvc3q6ntqymtuifq.mrta7nftmfxeo_igbvd4rl2kemmm0rg0wkqrxovaeik
它是由三段“乱码”字符串通过两个“.”连接在一起组成。官网https://jwt.io/提供了它的验证方式
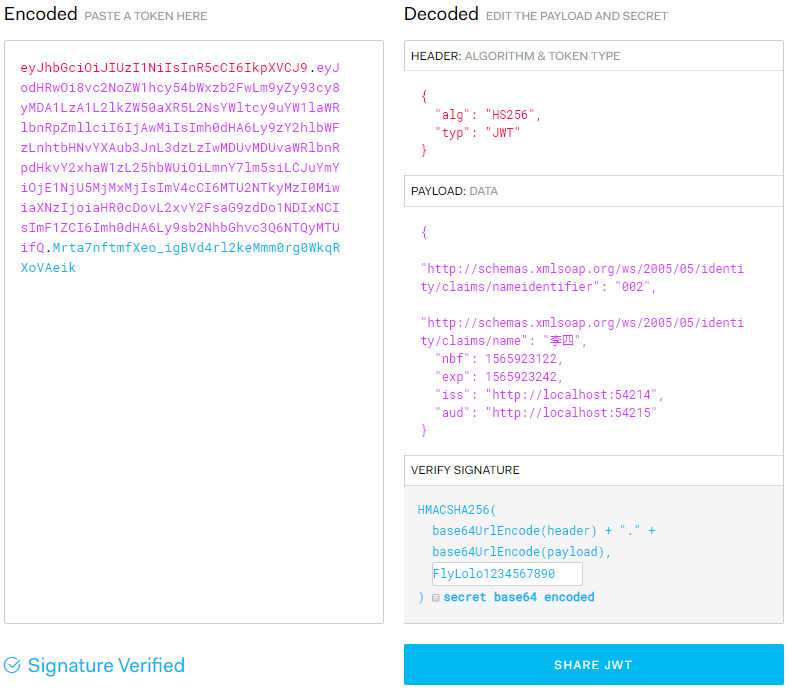
它的三个字符串分别对应了上图右侧的header、payload和signature三部分。
header:
header:
{
"alg": "hs256",
"typ": "jwt"
}
标识加密方式为hs256,token类型为jwt, 这段json通过base64url编码形成上例的第一个字符串
payload
payload是jwt用于信息存储部分,其中包含了许多种的声明(claims)。
可以自定义多个声明添加到payload中,系统也提供了一些默认的类型
iss (issuer):签发人
exp (expiration time):过期时间
sub (subject):主题
aud (audience):受众
nbf (not before):生效时间
iat (issued at):签发时间
jti (jwt id):编号
这部分通过base64url编码生成第二个字符串。
signature
signature是用于token的验证。它的值类似这样的表达式:signature = hmacsha256( base64urlencode(header) + "." + base64urlencode(payload), secret),也就是说,它是通过将前两个字符串加密后生成的一个新字符串。
所以只有拥有同样加密密钥的人,才能通过前两个字符串获得同样的字符串,通过这种方式保证了token的真实性。
三、认证流程
大概的流程是这样的:
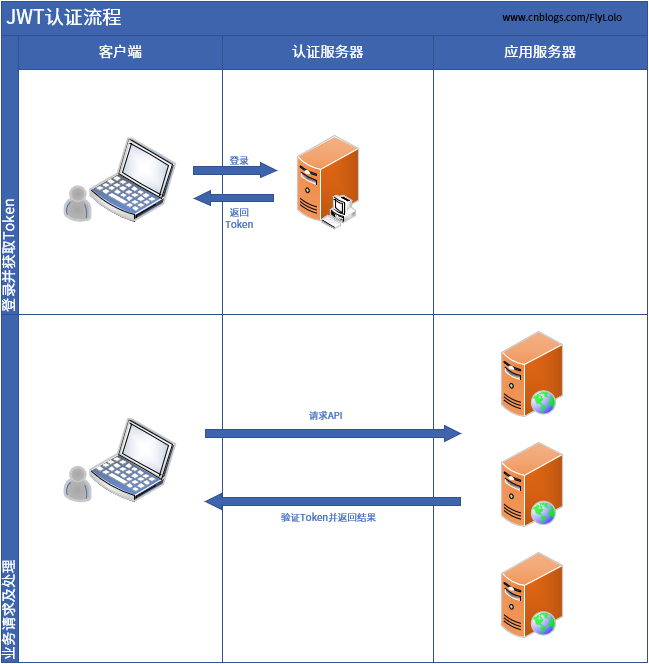
- 认证服务器:用于用户的登录验证和token的发放。
- 应用服务器:业务数据接口。被保护的api。
- 客户端:一般为app、小程序等。
认证流程:
- 用户首先通过登录,到认证服务器获取一个token。
- 在访问应用服务器的api的时候,将获取到的token放置在请求的header中。
- 应用服务器验证该token,通过后返回对应的结果。
说明:这只是示例方案,实际项目中可能有所不同。
- 对于小型项目,可能认证服务和应用服务在一起。本例通过分开的方式来实现,使我们能更好的了解二者之间的认证流程。
- 对于复杂一些的项目,可能存在多个应用服务,用户获取到的token可以在多个分布式服务中被认证,这也是jwt的优势之一。
关于jwt的文章很多,这里就不做过多介绍了。下面通过实际的例子来看一下 它是如何在asp.net core 中应用的。
四、应用实例
上一节的图:“jwt的认证流程”中涉及到客户端、认证服务器、应用服务器三部分,下面通过示例来对这三部分进行模拟:
- 认证服务器:新建一个webapi的解决方案,名为flylolo.jwt.server。
- 应用服务器:新建一个webapi的解决方案,名为flylolo.jwt.api。
- 客户端:这里用fiddler发送请求做测试。
认证服务
首先新建一个asp.net core 的解决方案webapi的解决方案
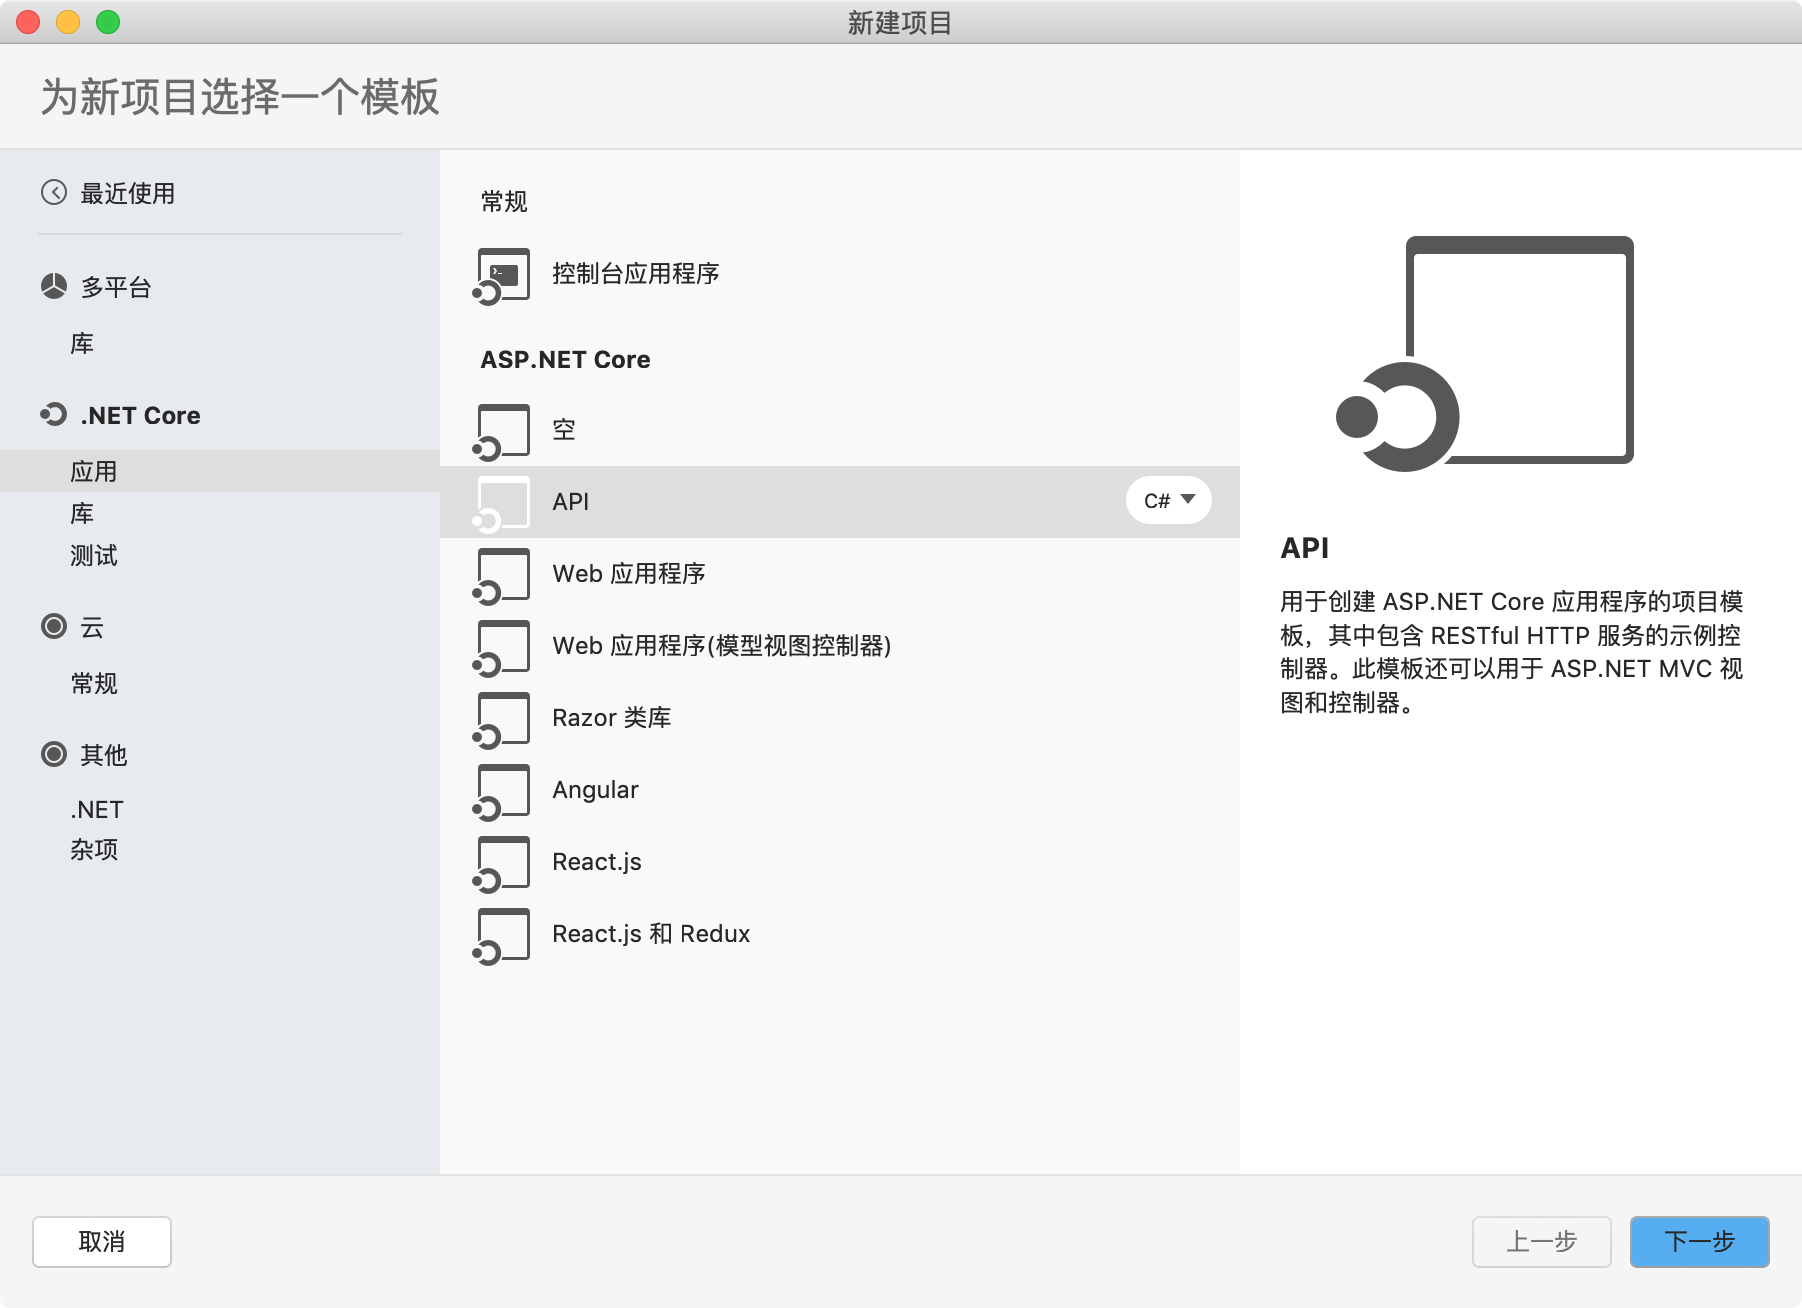
将其命名为flylolo.jwt.server。
首先新建一个tokencontroller用于登录和token的发放:
[route("api/[controller]")]
public class tokencontroller : controller
{
    private itokenhelper tokenhelper = null;
    public tokencontroller(itokenhelper _tokenhelper)
    {
        tokenhelper = _tokenhelper;
    }
    [httpget]
    public iactionresult get(string code, string pwd)
    {
        user user = temporarydata.getuser(code);
        if (null != user && user.password.equals(pwd))
        {
            return ok(tokenhelper.createtoken(user));
        }
        return badrequest();
    }
}
它有个名为get的action用于接收提交的用户名和密码,并进行验证,验证通过后,调用tokenhelper的createtoken方法生成token返回。
这里涉及到了user和tokenhelper两个类。
user相关:
public class user
{
    public string code { get; set; }
    public string name { get; set; }
    public string password { get; set; }
}
由于只是demo,user类只含有以上三个字段。在temporarydata类中做了user的模拟数据
    /// <summary>
    /// 虚拟数据,模拟从数据库或缓存中读取用户
    /// </summary>
    public static class temporarydata
    {
        private static list<user> users = new list<user>() { new user { code = "001", name = "张三", password = "111111" }, new user { code = "002", name = "李四", password = "222222" } };

        public static user getuser(string code)
        {
            return users.firstordefault(m => m.code.equals(code));
        }
    }
这只是模拟数据,实际项目中应该从数据库或者缓存等读取。
tokenhelper:
public class tokenhelper : itokenhelper
    {
        private ioptions<jwtconfig> _options;
        public tokenhelper(ioptions<jwtconfig> options)
        {
            _options = options;
        }

        public token createtoken(user user)
        {
            claim[] claims = { new claim(claimtypes.nameidentifier,user.code),new claim(claimtypes.name,user.name) };

            return createtoken(claims);
        }
        private token createtoken(claim[] claims)
        {
            var now = datetime.now;var expires = now.add(timespan.fromminutes(_options.value.accesstokenexpiresminutes));
            var token = new jwtsecuritytoken(
                issuer: _options.value.issuer,
                audience: _options.value.audience,
                claims: claims,
                notbefore: now,
                expires: expires,
                signingcredentials: new signingcredentials(new symmetricsecuritykey(encoding.utf8.getbytes(_options.value.issuersigningkey)), securityalgorithms.hmacsha256));
            return new token { tokencontent = new jwtsecuritytokenhandler().writetoken(token), expires = expires };
        }
    }
通过createtoken方法创建token,这里有几个关键参数:
- issuer token发布者
- audience token接受者
- expires 过期时间
- issuersigningkey 签名秘钥
对应的token代码如下:
    public class token
    {
        public string tokencontent { get; set; }

        public datetime expires { get; set; }
    }
这样通过tokenhelper的createtoken方法生成了一个token返回给了客户端。到现在来看,貌似所有的工作已经完成了。并非如此,我们还需要在startup文件中做一些设置。
public class startup
{
    // 。。。。。。此处省略部分代码

    public void configureservices(iservicecollection services)
    {
        //读取配置信息
        services.addsingleton<itokenhelper, tokenhelper>();
        services.configure<jwtconfig>(configuration.getsection("jwt"));
        //启用jwt
        services.addauthentication(options =>
        {
            options.defaultauthenticatescheme = jwtbearerdefaults.authenticationscheme;
            options.defaultchallengescheme = jwtbearerdefaults.authenticationscheme;
        }).
        addjwtbearer();
        services.addmvc().setcompatibilityversion(compatibilityversion.version_2_2);
    }

    public void configure(iapplicationbuilder app, ihostingenvironment env)
    {
        if (env.isdevelopment())
        {
            app.usedeveloperexceptionpage();
        }
        //启用认证中间件
        app.useauthentication();
        app.usemvc();
    }
}
这里用到了配置信息,在appsettings.json中对认证信息做配置如下:
  "jwt": {
    "issuer": "flylolo",
    "audience": "testaudience",
    "issuersigningkey": "flylolo1234567890",
    "accesstokenexpiresminutes": "30"
  }
运行这个项目,并通过fidder以get方式访问api/token?code=002&pwd=222222,返回结果如下:
{"tokencontent":"eyjhbgcioijiuzi1niisinr5cci6ikpxvcj9.eyjodhrwoi8vc2nozw1hcy54bwxzb2fwlm9yzy93cy8
ymda1lza1l2lkzw50axr5l2nsywltcy9uyw1lawrlbnrpzmllcii6ijawmiisimh0dha6ly9zy2hlbwfzlnhtbhnvyxaub3jnl
3dzlziwmduvmduvawrlbnrpdhkvy2xhaw1zl25hbwuioilmny7lm5silcjuymyioje1njy3otg0nzusimv4cci6mtu2njgwmdi
3nswiaxnzijoirmx5tg9sbyisimf1zci6ilrlc3rbdwrpzw5jzsj9.bvf3gouw1e9rtoqky8xxp8uivzkl-lba-q9fb9qtez4",
"expires":"2019-08-26t21:17:55.1183172+08:00"}
客户端登录成功并成功返回了一个token,认证服务创建完成
应用服务
新建一个webapi的解决方案,名为flylolo.jwt.api。
添加bookcontroller用作业务api。
[route("api/[controller]")]
[authorize]
public class bookcontroller : controller
{
    // get: api/<controller>
    [httpget]
    [allowanonymous]
    public ienumerable<string> get()
    {
        return new string[] { "asp", "c#" };
    }

    // post api/<controller>
    [httppost]
    public jsonresult post()
    {
        return new jsonresult("create  book ...");
    }
}
对此controller添加了[authorize]标识,表示此controller的action被访问时需要进行认证,而它的名为get的action被标识了[allowanonymous],表示此action的访问可以跳过认证。
在startup文件中配置认证:
public class startup
{
// 省略部分代码
    public void configureservices(iservicecollection services)
    {
        #region 读取配置
        jwtconfig config = new jwtconfig();
        configuration.getsection("jwt").bind(config);
        #endregion

        #region 启用jwt认证
        services.addauthentication(options =>
        {
            options.defaultauthenticatescheme = jwtbearerdefaults.authenticationscheme;
            options.defaultchallengescheme = jwtbearerdefaults.authenticationscheme;
        }).
        addjwtbearer(options =>
        {
            options.tokenvalidationparameters = new tokenvalidationparameters
            {
                validissuer = config.issuer,
                validaudience = config.audience,
                issuersigningkey = new symmetricsecuritykey(encoding.utf8.getbytes(config.issuersigningkey)),
                clockskew = timespan.fromminutes(1)
            };
        });
        #endregion

        services.addmvc().setcompatibilityversion(compatibilityversion.version_2_2);
    }

    // this method gets called by the runtime. use this method to configure the http request pipeline.
    public void configure(iapplicationbuilder app, ihostingenvironment env)
    {
        if (env.isdevelopment())
        {
            app.usedeveloperexceptionpage();
        }
        app.useauthentication();
        app.usemvc();
    }
}
这里同样用到了配置:
    public class jwtconfig
    {
        public string issuer { get; set; }
        public string audience { get; set; }
        public string issuersigningkey { get; set; }
        public int accesstokenexpiresminutes { get; set; }
    }
appsettings.json:
  "jwt": {
    "issuer": "flylolo",
    "audience": "testaudience",
    "issuersigningkey": "flylolo1234567890",
    "accesstokenexpiresminutes": "30"
  }
关于jwt认证,这里通过options.tokenvalidationparameters对认证信息做了设置,validissuer、validaudience、issuersigningkey这三个参数用于验证token生成的时候填写的issuer、audience、issuersigningkey,所以值要和生成token时的设置一致。
clockskew默认值为5分钟,它是一个缓冲期,例如token设置有效期为30分钟,到了30分钟的时候是不会过期的,会有这么个缓冲时间,也就是35分钟才会过期。为了方便测试(不想等太长时间),这里我设置了1分钟。
tokenvalidationparameters还有一些其他参数,在它的构造方法中已经做了默认设置,代码如下:
public tokenvalidationparameters()
{
    requireexpirationtime = true;
    requiresignedtokens = true;
    savesignintoken = false;
    validateactor = false;
    validateaudience = true;  //是否验证接受者
    validateissuer = true;   //是否验证发布者
    validateissuersigningkey = false;  //是否验证秘钥
    validatelifetime = true; //是否验证过期时间
    validatetokenreplay = false;
 }
访问api/book,正常返回了结果
["asp","c#"]
通过post方式访问,返回401错误。
这就需要使用获取到的toke了,如下图方式再次访问

添加了“authorization: bearer token内容”这样的header,可以正常访问了。
至此,简单的jwt认证示例就完成了,代码地址https://github.com/flylolo/jwt.demo/releases/tag/1.0。
这里可能会有个疑问,例如:
1.token被盗了怎么办?
答: 在启用https的情况下,token被放在header中还是比较安全的。另外token的有效期不要设置过长。例如可以设置为1小时(微信公众号的网页开发的token有效期为2小时)。
2. token到期了如何处理?
答:理论上token过期应该是跳到登录界面,但这样太不友好了。可以在后台根据token的过期时间定期去请求新的token。下一节来演示一下token的刷新方案。
五、token的刷新
为了使客户端能够获取到新的token,对上文的例子进行改造,大概思路如下:
- 用户登录成功的时候,一次性给他两个token,分别为accesstoken和refreshtoken,accesstoken用于正常请求,也就是上例中原有的token,refreshtoken作为刷新accesstoken的凭证。
- accesstoken的有效期较短,例如一小时,短一点安全一些。refreshtoken有效期可以设置长一些,例如一天、一周等。
- 当accesstoken即将过期的时候,例如提前5分钟,客户端利用refreshtoken请求指定的api获取新的accesstoken并更新本地存储中的accesstoken。
所以只需要修改flylolo.jwt.server即可。
首先修改token的返回方案,新增一个model
    public class complextoken
    {
        public token accesstoken { get; set; }
        public token refreshtoken { get; set; }
    }
包含accesstoken和refreshtoken,用于用户登录成功后的token结果返回。
修改 appsettings.json,添加两个配置项:
    "refreshtokenaudience": "refreshtokenaudience",
    "refreshtokenexpiresminutes": "10080" //60*24*7
refreshtokenexpiresminutes用于设置refreshtoken的过期时间,这里设置了7天。refreshtokenaudience用于设置refreshtoken的接受者,与原audience值不一致,作用是使refreshtoken不能用于访问应用服务的业务api,而accesstoken不能用于刷新token。
修改tokenhelper:
    public enum tokentype
    {
        accesstoken = 1,
        refreshtoken = 2
    }
    public class tokenhelper : itokenhelper
    {
        private ioptions<jwtconfig> _options;
        public tokenhelper(ioptions<jwtconfig> options)
        {
            _options = options;
        }

        public token createaccesstoken(user user)
        {
            claim[] claims = new claim[] { new claim(claimtypes.nameidentifier, user.code), new claim(claimtypes.name, user.name) };

            return createtoken(claims, tokentype.accesstoken);
        }

        public complextoken createtoken(user user)
        {
            claim[] claims = new claim[] { new claim(claimtypes.nameidentifier, user.code), new claim(claimtypes.name, user.name)
                //下面两个claim用于测试在token中存储用户的角色信息,对应测试在flylolo.jwt.api的两个测试controller的put方法,若用不到可删除
                , new claim(claimtypes.role, "testputbookrole"), new claim(claimtypes.role, "testputstudentrole")
            };

            return createtoken(claims);
        }

        public complextoken createtoken(claim[] claims)
        {
            return new complextoken { accesstoken = createtoken(claims, tokentype.accesstoken), refreshtoken = createtoken(claims, tokentype.refreshtoken) };
        }

        /// <summary>
        /// 用于创建accesstoken和refreshtoken。
        /// 这里accesstoken和refreshtoken只是过期时间不同,【实际项目】中二者的claims内容可能会不同。
        /// 因为refreshtoken只是用于刷新accesstoken,其内容可以简单一些。
        /// 而accesstoken可能会附加一些其他的claim。
        /// </summary>
        /// <param name="claims"></param>
        /// <param name="tokentype"></param>
        /// <returns></returns>
        private token createtoken(claim[] claims, tokentype tokentype)
        {
            var now = datetime.now;
            var expires = now.add(timespan.fromminutes(tokentype.equals(tokentype.accesstoken) ? _options.value.accesstokenexpiresminutes : _options.value.refreshtokenexpiresminutes));//设置不同的过期时间
            var token = new jwtsecuritytoken(
                issuer: _options.value.issuer,
                audience: tokentype.equals(tokentype.accesstoken) ? _options.value.audience : _options.value.refreshtokenaudience,//设置不同的接受者
                claims: claims,
                notbefore: now,
                expires: expires,
                signingcredentials: new signingcredentials(new symmetricsecuritykey(encoding.utf8.getbytes(_options.value.issuersigningkey)), securityalgorithms.hmacsha256));
            return new token { tokencontent = new jwtsecuritytokenhandler().writetoken(token), expires = expires };
        }

        public token refreshtoken(claimsprincipal claimsprincipal)
        {
            var code = claimsprincipal.claims.firstordefault(m => m.type.equals(claimtypes.nameidentifier));
            if (null != code )
            {
                return createaccesstoken(temporarydata.getuser(code.value.tostring()));
            }
            else
            {
                return null;
            }
        }
    }
在登录后,生成两个token返回给客户端。在tokenhelper添加了一个refreshtoken方法,用于生成新的accesstoken。对应在tokencontroller中添加一个名为post的action,用于调用这个refreshtoken方法刷新token
[httppost]
[authorize]
public iactionresult post()
{
    return ok(tokenhelper.refreshtoken(request.httpcontext.user));
}
这个方法添加了[authorize]标识,说明调用它需要refreshtoken认证通过。既然启用了认证,那么在startup文件中需要像上例的业务api一样做jwt的认证配置。
        public void configureservices(iservicecollection services)
        {
            #region 读取配置信息
            services.addsingleton<itokenhelper, tokenhelper>();
            services.configure<jwtconfig>(configuration.getsection("jwt"));
            jwtconfig config = new jwtconfig();
            configuration.getsection("jwt").bind(config);
            #endregion

            #region 启用jwt
            services.addauthentication(options =>
            {
                options.defaultauthenticatescheme = jwtbearerdefaults.authenticationscheme;
                options.defaultchallengescheme = jwtbearerdefaults.authenticationscheme;
            }).
             addjwtbearer(options =>
             {
                 options.tokenvalidationparameters = new tokenvalidationparameters
                 {
                     validissuer = config.issuer,
                     validaudience = config.refreshtokenaudience,
                     issuersigningkey = new symmetricsecuritykey(encoding.utf8.getbytes(config.issuersigningkey))
                 };
             });
            #endregion

            services.addmvc().setcompatibilityversion(compatibilityversion.version_2_2);
        }
注意这里的validaudience被赋值为config.refreshtokenaudience,和flylolo.jwt.api中的不一致,用于防止accesstoken和refreshtoken的混用。
再次访问/api/token?code=002&pwd=222222,会返回两个token:
{"accesstoken":{"tokencontent":"eyjhbgcioijiuzi1niisinr5cci6ikpxvcj9.eyjodhrwoi8vc2nozw1hcy54bwxzb2fwlm9yzy93cy8y
mda1lza1l2lkzw50axr5l2nsywltcy9uyw1lawrlbnrpzmllcii6ijawmiisimh0dha6ly9zy2hlbwfzlnhtbhnvyxaub3jnl3dzlziwmduvmduva
wrlbnrpdhkvy2xhaw1zl25hbwuioilmny7lm5silcjodhrwoi8vc2nozw1hcy5tawnyb3nvznquy29tl3dzlziwmdgvmdyvawrlbnrpdhkvy2xhaw
1zl3jvbguiolsivgvzdfb1dejvb2tsb2xliiwivgvzdfb1dfn0dwrlbnrsb2xlil0sim5izii6mtu2njgwnjq3oswizxhwijoxnty2oda4mjc5lcj
pc3mioijgbhlmb2xviiwiyxvkijoivgvzdef1zgllbmnlin0.wlmors1v0xp0fb2mdx7ji7zsgzbb2do3u78bakiiwgg",
"expires":"2019-08-26t22:31:19.5312172+08:00"},

"refreshtoken":{"tokencontent":"eyjhbgcioijiuzi1niisinr5cci6ikpxvcj9.eyjodhrwoi8vc2nozw1hcy54bwxzb2fwlm9yzy93cy8y
mda1lza1l2lkzw50axr5l2nsywltcy9uyw1lawrlbnrpzmllcii6ijawmiisimh0dha6ly9zy2hlbwfzlnhtbhnvyxaub3jnl3dzlziwmduvmduva
wrlbnrpdhkvy2xhaw1zl25hbwuioilmny7lm5silcjodhrwoi8vc2nozw1hcy5tawnyb3nvznquy29tl3dzlziwmdgvmdyvawrlbnrpdhkvy2xhaw
1zl3jvbguiolsivgvzdfb1dejvb2tsb2xliiwivgvzdfb1dfn0dwrlbnrsb2xlil0sim5izii6mtu2njgwnjq3oswizxhwijoxnty3ndexmjc5lcj
pc3mioijgbhlmb2xviiwiyxvkijoiumvmcmvzafrva2vuqxvkawvuy2uifq.3edi6cqbqa39-ywq2ejfgim8w2ky5l9qaowaidi8fni",
"expires":"2019-09-02t22:01:19.6143038+08:00"}}
可以使用refreshtoken去请求新的accesstoken

测试用accesstoken可以正常访问flylolo.jwt.api,用refreshtoken则不可以。
至此,token的刷新功能改造完成。代码地址:https://github.com/flylolo/jwt.demo/releases/tag/1.1
疑问:refreshtoken有效期那么长,被盗了怎么办,和直接将accesstoken的有效期延长有什么区别?
个人认为:1. refreshtoken不像accesstoken那样在大多数请求中都被使用。2. 应用类的api较多,对应的服务(器)也可能较多,所以泄露的概率更大一些。